Wall Weaving – What I learned/tips & tricks:

It's no secret that the seventies have come back with a vengeance. One of the
amazing things about fashion revival, in my humble opinion, is its tendency to
resurrect the best of any given era.
I think most of us will admit that with
any generation there are always horrendous trends we’re happy to bid adieu
(goodbye neon and first generation stretchy jeans), but the ones that make
their way back around seem to withstand the test of time; especially when
integrated into fresher trends (hello Birkenstocks and minimalist fashion).
Wall weaving I think falls into the latter category. With
the popularity of the gallery wall in residential homes these days comes the
need for additional aesthetic interest in the form of varied textures. Weavings
satisfy this need magnificently. They look fantastic on a wall mixed with
framed prints; they add warmth by breaking up the glass, metal and wood; they’re
easy to make and customizable to any pallet your room decor may embody.
I won’t bore anybody with a detailed tutorial on how to
actually make a wall weaving. It’s been done; and done fantastically. You don’t need to go any further than these
tutorials from Honestly
WTF and A
Beautiful Mess. As far as steps and visual aids, you need go no further.
However, I did learn some things in my personal weaving experience.
First, before I tell you what I learned, here’s some basic jargon just so you know what the heck I’m talking about.
Warp – This is the base of your weaving, or the vertical
threads.
Weft – This is the ‘rest’ of the weaving, or the fun part
that threads horizontally throughout the textile. This is where all the
creativity comes in. The weft can be any type of yarn in any thickness or
color.
Okay, here’s what I learned:
1)
Don’t be afraid to incorporate beads into your weaving.
I didn’t happen to do this for the weaving
shown in my images, but it’s a nice addition. BUT, it’s much easier to
incorporate the beads in the WARP instead of the weft. This is mainly because, more often than not, the weft
consists of thick, bulky yarns and such.
It’s very hard to thread a bead onto a thick yarn. As your setting up
your warp, however, throw on a few beads of your choice and weave around them as
you go along.
2)
If you have a fuzzy pet you WILL get it all up
in your weave.
 |
| You can see dark dog hairs embedded in the roving and lower left side... |
Don’t fight it, it’s going to happen no
matter what you do. You could weave in a hermetically sealed room in your home
and still get fur all up in your weave. Just accept it and do your best to
pluck them out with tweezers when you’re all done.
3)
Use textures OTHER than yarn:
 |
| You can see the hemp I braided in the middle. |
To make your weave more interesting,
incorporate avant garde textures like leather, hemp, twigs or scraps of fabric.
I happened to have a giant ball of hemp sitting around, so I wove a few strands
into a braid as long as the total width of my finished weaving and wove that
braid through the warp in lieu of other yarns. Let your creativity shine
though. Think outside the box. In the spring I’d love to weave fresh herb
sprigs into my textiles to add interest and (bonus!) a heavenly aroma.
4)
Don’t use more than (about) five colors.


This rule excludes your ‘avan garde’
textures. Here, I’m just considering the yarns themselves. Here’s how I like to
do it: pick three colors that are all a part of the same family. In my case I
chose four neutral colors in creams, grey and white. The remaining two yarns should be accent
colors not in the family of the previous ones. In my case these were the
mustard yellow and lavender. I thought they complimented each other nicely,
worked with the colors already in my room and didn’t fight with my neutral
yarns. Follow this rule and your weaving will never look like bag of skittles
slapped on your wall.
5)
To finish off your weaving tie knots at the top:
Some tutorials will tell you to cut the
loops at the top, tuck the extra threads back into the weaving and add new
loops to slip a rod through. Personally, I found it much easier to just slip
the warp off the pegs and tie knots flush with the yarn (weft) all across the
top. This method keeps all the yarn in place, while also providing a loop to
slip your rod, pole or branch through. Of course, if your loom doesn’t use pegs
and instead requires that your wrap the warp around the loom in a crisscrossing
fashion, then you’ll be forced to
cut the warps.
6)
If at all possible, don’t cross the warps:

The
picture frame DIY method works
wonderfully, but it does force your to cross the warps. When this is the
case,
weaving the weft over and under becomes much more difficult because the
warps are not all on the same plane, if you catch my meaning. So, the
first several
rows are difficult to start. To avoid this problem, I used the peg loom.
I
found it much easier. They’re
not all that expensive and especially worth the investment if you plan on
making several wall weavings for a gallery wall or as gifts. Another option is
to hammer in some nails into a picture frame to make a peg loom in a
pinch. Just make sure the frame is sturdy and protect yourself accordingly when
using a hammer.
7)
Mix it up by changing the color of the warp:
 |
| Above the roving is the warp. Change the color to mix things up! |
You can add a whole new layer of interest
to your weaving if you change the color of the warp threads. If you’re
clever enough you could even come out with a plaid effect.
8)
Wool roving is great:

Roving is the big chunky loopy stuff at the
top of my weaving. Essentially, roving is the yarn before it’s actually spun
into yarn. It adds great texture and makes your weaving look a cut above the
rest.
9)
Leave some of your tassels in loops:

If you’ve perused the tutorials mentioned
above then you’ve learned how to make a tassel. If this is the case then you’ll
know once you’ve made your tassel, some of the threads will be looped. Why not
leave them in place? The tassels on the bottom of my weaving I cut, but the
ones in the middle I mixed up a bit. As you can see I left the yellow ones
partly looped. I just liked the way it looked. Also, it was a small feature
that made the yellow tassels on the bottom look different from the ones on top.
10)
Balance out the focal points:


By focal points I mean things like tassels,
extra-large textures (roving), incorporated twigs/herbs, and unusual textures.
These things all add interest, but less is more. I balanced out my focal points
by limiting myself to three: the yellow and grey tassels at the bottom; the
white, lavender and yellow tassels in the center; and the wool roving at the
top. By limiting my focal points to
three and placing them the way I did, I invite the eye to wander across the whole
weaving instead of landing on any particular spot.
11) Weave in different patterns.

You can break up the monotony of using one particular yarn by weaving it in a different pattern.
I hope these tips help you on your own weaving adventure!
Holiday Gift Tags Inspired by Anthropologie //
I was finally getting around to some of my Holiday shopping
the other day and ended up stopping at one of my favorite stores --
Anthropologie. Once at the checkout line, the cashier was carefully wrapping up
my purchases and bagging them. I asked if they had any gift boxes and
after tucking those into my shopping bag the lovely cashier tossed in some of
their beautiful gift tags shown below.
Knowing that if I asked for a dozen more of them I’d look like
(and actually be) a selfish jerk, so
I decided to make some of my own.

Here's all you need:

Rosemary twigs - the Anthropologie tags just had regular twigs, but I have a potted rosemary plant
in my dining room that I'm desperately trying to keep alive for the winter as they
are not perennials in my part of The States. Plus, there's the AMAAAAZING
smell.
Glitter - I happened to use white and green.
Acrylic Paint in green
Your choice of glue
Thin wire in your choice of color - I chose green, gold and copper
Hole puncher
Scissors
Silver leaf
Paint brushes
Twine - on the thin side
Gold marker for writing
Heavyweight paper


First, strip off most of the needles on each rosemary twig. Leave about an inch of needles towards the top.

Throw your extra rosemary needles in a soup or in your fireplace. The whole house will smell incredible.

Next,
take your heavyweight paper and cut them into long rectangles to fold
into cards. Size is entirely subjective. My only suggestion is to make
them fold on the shorter side and big enough that your whole rosemary
twig will fit inside.

Now
we're going to paint our trees. Basically it's one long zig-zag
starting from the folded side and getting progressively wider towards
the bottom or open side.


 |
| My trees compared to the original Anthropologie gift tag in the center |


Once
your painted trees are dry, throw on some of your glue in an
aesthetically pleasing, half-hazard way and sprinkle on your glitter of
choice.


Use
that same glue and dab it onto the needle-free portion of each of your
rosemary twigs. Take small quarter-sized pieces of your silver leaf and
place it gently onto the glue covered rosemary sprigs. Use one of your
clean paint brushes to spread out the portions of silver leaf onto the
length of the twig.
 |
| Silver leaf rosemary sprigs! |
Now we add the colored wire.
The original Anthropologie gift tags actually have green thread wrapped
around them, but I liked the idea of adding something with its own
shine, so I chose thin wire.
I
concentrated my wire wrappings on the center of each sprig. Don't
cover the whole thing otherwise the silver leaf will be obscured.
 |
| Copper wire wrapped sprig on the left and gold on the right. |

That's
pretty much it for the face of the gift tags! Now all we have to do is
punch a couple of holes in the back side for the twine to go through so
we can wrap them around our gifts.


That's it! Sign 'em and wrap 'em


.jpeg)
[This is not a sponsored post and I was not paid to promote any company or product in this post]
DIY Stone-Adorned Lucite Jewelry Box //


DIY Stone-Adorned Lucite Jewelry Box //
Confession: I have A
LOT of costume jewelry.
In fact, I have such a collection, that I sometimes forget
what I actually have. I know, it’s a sickness; but I do love it so.
Because of my addiction, I found it necessary to adopt a way
to display my bobbles; something that would be both attractive and
functional. Enter – the Lucite box.
Yes, I now, I’m a little late to the Lucite craze. At first I wasn’t so taken with it, but over
time it’s grown on me. Lucite is so much
more than just a plastic. Typically, the
thickness of the Lucite {regardless of what form it takes – box, tray, stapler,
stationary holder} is about a quarter of an inch, giving the edges of your item
a lovely reflective quality more along the lines of glass, rather than plastic. All the durability of plastic with the
crystal-clear look of glass.
Now, some of my favorite retailers sell these exquisite Lucite jewelry boxes adorned
with rough-cut semi-precious stones.
They. Are. Beautiful. But -- full disclosure -- they are WAY
overpriced. Honestly, some of them
retail for over one thousand dollars. Now,
I have to ask myself, WHO IS BUYING THIS STUFF?
Not I.
So, I decided to make a facsimile.
Here’s what you’ll need {with accompanying links}:
- Lucite boxes with hinged lids
 |
| This is a geode I found online. It breaks into two halves with the lovely crystals inside. |
 |
 |
| These agate slices are amazing. The druzy in the center adds sparkle too! |
- Clear-drying Glue {that adheres to plastics}
- Something to line the bottom of your boxes.
This is optional, but I thought it was a great opportunity to add a pop of color. I happened to use some decorative patterned paper I found at a local art shop. But you could use anything you like -- magazine clippings, wrapping paper, scrap fabrics, old linens.
This is optional, but I thought it was a great opportunity to add a pop of color. I happened to use some decorative patterned paper I found at a local art shop. But you could use anything you like -- magazine clippings, wrapping paper, scrap fabrics, old linens.
 |
| There's my blue and gold paper! Fifth from the top. |
 |
| Many of these papers, like the two silver and gold ones at the bottom, had wonderful texture as well as color. |
 |
| I really liked these. They had tiny sparkles embedded within the paper. Really caught the light. |
 | |
| I was very temped by these gold and black striped papers, but I opted for my blue and gold because I wanted to add color. |
At this point, it’s as simple as you think.
Optional Preliminary Step
-- Gilding the Agate Slice Edges:
I’ve come to the conclusion that I love metallic
accents. When the opportunity presents
itself to add a touch of gold, silver {pick a metal} I usually take it. So, when I saw the raw edges of my agate
slice, I heard it begging to be painted.
 |
| The two polishes I used are shown above. The first coat was the yellow {left} and the second was the lighter gold {right}. |
Unfortunately, I didn’t have any gold paint {how?!}. But I DID have some gold nail polish! That’s right.
I painted the edges of my agate slice with gold nail polish. When in doubt, branch out. I painted two coats. Let it dry overnight and continue on with the
next steps.
Step One – Arrange Your Stones:
Arrange your stones the way you’d like on your Lucite box. Once you have it the way you’d like it, glue
it in place. Remember, less is more when
it comes to glue. Yes, it dries clear, but
if it oozes out the sides, its texture will still be visible.
Step Two -- Line Your Box:
Measure the inside dimensions of your box. Cut your paper {or fabric} to those dimensions
and simply line your box.
 |
| This was the paper I ended up with -- a lovely robin's egg blue with gold. |
 |
| The gold was SO reflective; just love it! |
Now, I did NOT glue my paper to my box. I didn’t do this for one simple reason: I may
get tired of that pattern and want to change it later. By not gluing it, I keep my options
open. I can change it any time I want
and to suit any décor I may have.
That’s it!
Arrange your bobbles and enjoy!
DIY Rustic White-Wash Tripod for Pendant Light Cords ||

Recessed lighting.
Who doesn’t love its instant glamor effects? But since I’m perpetually
on a budget, recessed lighting don’t fly.
I have to make due with avant garde lamps and lighting
alternatives. That’s where these pendant
lights come in. All the benefit of
pendant lights, but with a long flexible cord that you can hang at any height
and wrap around whatever you can imagine.
In this case I wanted something a little on the rustic side. A little bohemian chic, if you will.
I took inspiration from those sweet little
hippie/bohemian/gypsy tents you see all over Pinterest and Free People and
Anthropologie display floors. I loved
the idea of the white-washed rustic wooden tent effect and hanging the pendant
light on that. Here’s how I did it:
Materials:
Pendant Light Cord
Edison Bulb
Found Wooden Branches {3, plus 1 test piece}
1 Quart of White Sample Paint
Foam Brush
Disposable Container
Paint Sturer
Paper Towels
Step One –
Gather the wood:
I found my wooden staffs in the woods that abut my
house. My suggestion is that you go for
a lovely hike and locate yours, or, if you’re as lucky as me, go into your own
backyard and do likewise. I must confess,
though, that I gathered mine in the very earliest stages of spring – before the
green sprung. The woods are magnificent,
but I must admit that the area around my home is absolutely blanketed with poison ivy during the
high season. And, I swear, if I just walk by the stuff I break out in those
horrible itchy bubbles, so I have to stay clear this time of year.
 |
| Don't mind my stacks of Harry Potter's and Narnia in the background... Oh hey look, old text books! |
Now, in truth, these pendant lights do not weigh much at
all, so I didn’t really need to worry about the sturdiness of my staffs [per
se], but if you want to make sure that they don’t break on you months later
here’s my suggestion: locate a fallen branch in the woods that looks like it
will fit the bill, pick it up and wham it as hard as you can against a nearby
established [old] tree. [WEAR GOGGLES,
HEAVY CLOTHES AND GLOVES TO AVOID INJURIES!] Now if the branch shatters into
several pieces, obviously it’s not the one for you. Keep looking.
Occasionally I would find a good looking specimen and slam it against a
tree to make it a more reasonable length, although this isn’t entirely necessary because we’ll be
taking care of length in another step.
One important thing to remember here is to locate nearly, if
not entirely, bark-free staffs. This
will help the white-wash stick better and help you achieve the look I did in my
images. Also, pick up an extra bark-less
mini piece of wood to do paint tests
on later.
You need three
staffs in total, plus the mini. Once you
find them, continue on your hike and take them home.
Step Two –
Prep the staffs:
Use a damp paper towel or cloth and clean the staffs; this
includes taking off any residual bark as best you can. Let them dry for a day to be safe before you
start painting.
In the meantime, we can shorten the staffs to the lengths we
like. Again, adult supervision necessary. Protect
yourself accordingly. Get yourself a
saw and a sturdy surface and sheer those babies off to your desired length.
Mine was about 6 feet. Of course, you
could look for the perfect length while you’re scouring for the staffs in the
woods, but I prefer to shave the lengths off anyway because I want the bottom
of my staffs to be flat so they’re sturdier while balanced on my floor.
Tip for selecting the
lengths of your staffs: The length of your staffs really depends on how
tall your ceilings are and how high you want the pendant to be. As you can see from my images, the cord is
wrapped around the staffs where they meet at the top and hangs down the
center. The taller your staffs, the
higher the intersection of the three will be and the higher your pendant will
hang. Keep this in mind while you’re
selecting your staffs in the woods and sheering them off later.
Step Three –
Prep the white-wash:

If you research on the internet, you’ll find all manner of
white-wash paints and stains, but don’t bog yourself down with all of that
information. Take my advice instead. You
know those quart sized samples you can get at home improvement stores [seen in the far left of the image above]? Well,
they all start off as white before they mix the color sample in, so just get
one of those quart size samples in white. While you’re there pick up a foam
brush, paint stirrer and a plastic container to mix the white paint and water
in.
Here’s where the paint tests come in. Pour some of the white paint into your
plastic disposable container and then start adding water a couple of table
spoons at a time and mix in with a paint stirrer. Use the foam brush to paint on your test
piece of wood [that you’ve cleaned and prepped earlier with the other three
staffs] to see how it works for you.
Now this is the important tip: Use some paper towels to
wipe off the paint immediately after
you put it on. So, paint your test piece of wood in small sections, wipe it off
immediately and see how it looks. You
can be pretty vigorous here. Don’t worry
about taking off too much paint – it’s impossible. The stain effect will be immediate and
permanent, regardless of how vigorous you wipe the paint off.
 |
| My test piece. You can see in the image the difference between the unstained wood [bottom] and the white-washed [above]. |
If it’s not sheer enough after your test, add
more water. Keep going until it looks
right for you. You’ll probably have to
add more water than you think. Once you’ve got the ratios right, you’re ready
to paint the real thing.
Step Four –
Painting the staffs:
Follow the procedure mentioned above for achieving the white-wash
look. At this point you should be a pro,
having used your test piece to full advantage already. My advice is to work in sections. If you try to paint the whole staff [or too
large of a section] at once, you’ll find that too much of the paint has seeped
into the wood and it won’t wipe off as easy. This will result in patchy paint
work.
Not pretty. Work in small sections.


Once all the staffs are painted, let them dry for a day
before lashing them together.
Step Five –
Lashing the staffs together:
I played around with my staffs for a little bit; putting one
uneven end [the non-flat, sawed off
end] over the other to see which position I liked best. Once I had them in the position I liked, I
wrapped a long length of leather cord around the intersection several times and
tied it with a double-knotted bow.
That’s it.

It doesn’t get any more complicated than that.
My only suggestion is to lash them together in the area
where you’ll actually be displaying your DIY lamp permanently. This way you don’t have to worry about
transportation later.
Spread out the feet as wide as you can and get it into a
sturdy position.
Step Six –
Wrapping the pendant light:

This step is very subjective. It all depends on the look you want. I elected to wrap most of my cord around the
staffs themselves, but I’ve seen other people
wrap the cord more along the legs and down the staffs, or curling the length up into several ‘O’s and
keeping them together with a zip tie and letting it hang. It’s entirely up to
you. I would only gently suggest that you don’t allow the cord to lie on the
floor at all to protect it from children, pets and the vacuum cleaner.


Hang it the way you like it and enjoy!
{See images below for closeups of my vignette and details on my little bobbles.}
 |
| Crystal point necklaces. Found in another of my posts here // Kate Spade Skinny Mini Necklace on right // Vintage necklace in center. |
 | |
| Front, center - Lulu Frost bracelet // Barr-Co. perfume found here // My collection of threadbare rings |
 |
| Bracelets {from bottom up} - deco inspired cuff // vintage bakelite // Et Cetera, Et Cetera Idion Bangle // Vintage orange leopard hinge bangle found at the Brimfield Antique Fair |
 |
| \\ Vintage crystal screw-back earrings // |
 |
| \\ Hand painted {by yours truly} pheasant feathers // |


MERRY CHRISTMAS !!!
Have a safe and joyous Holiday, Everyone!

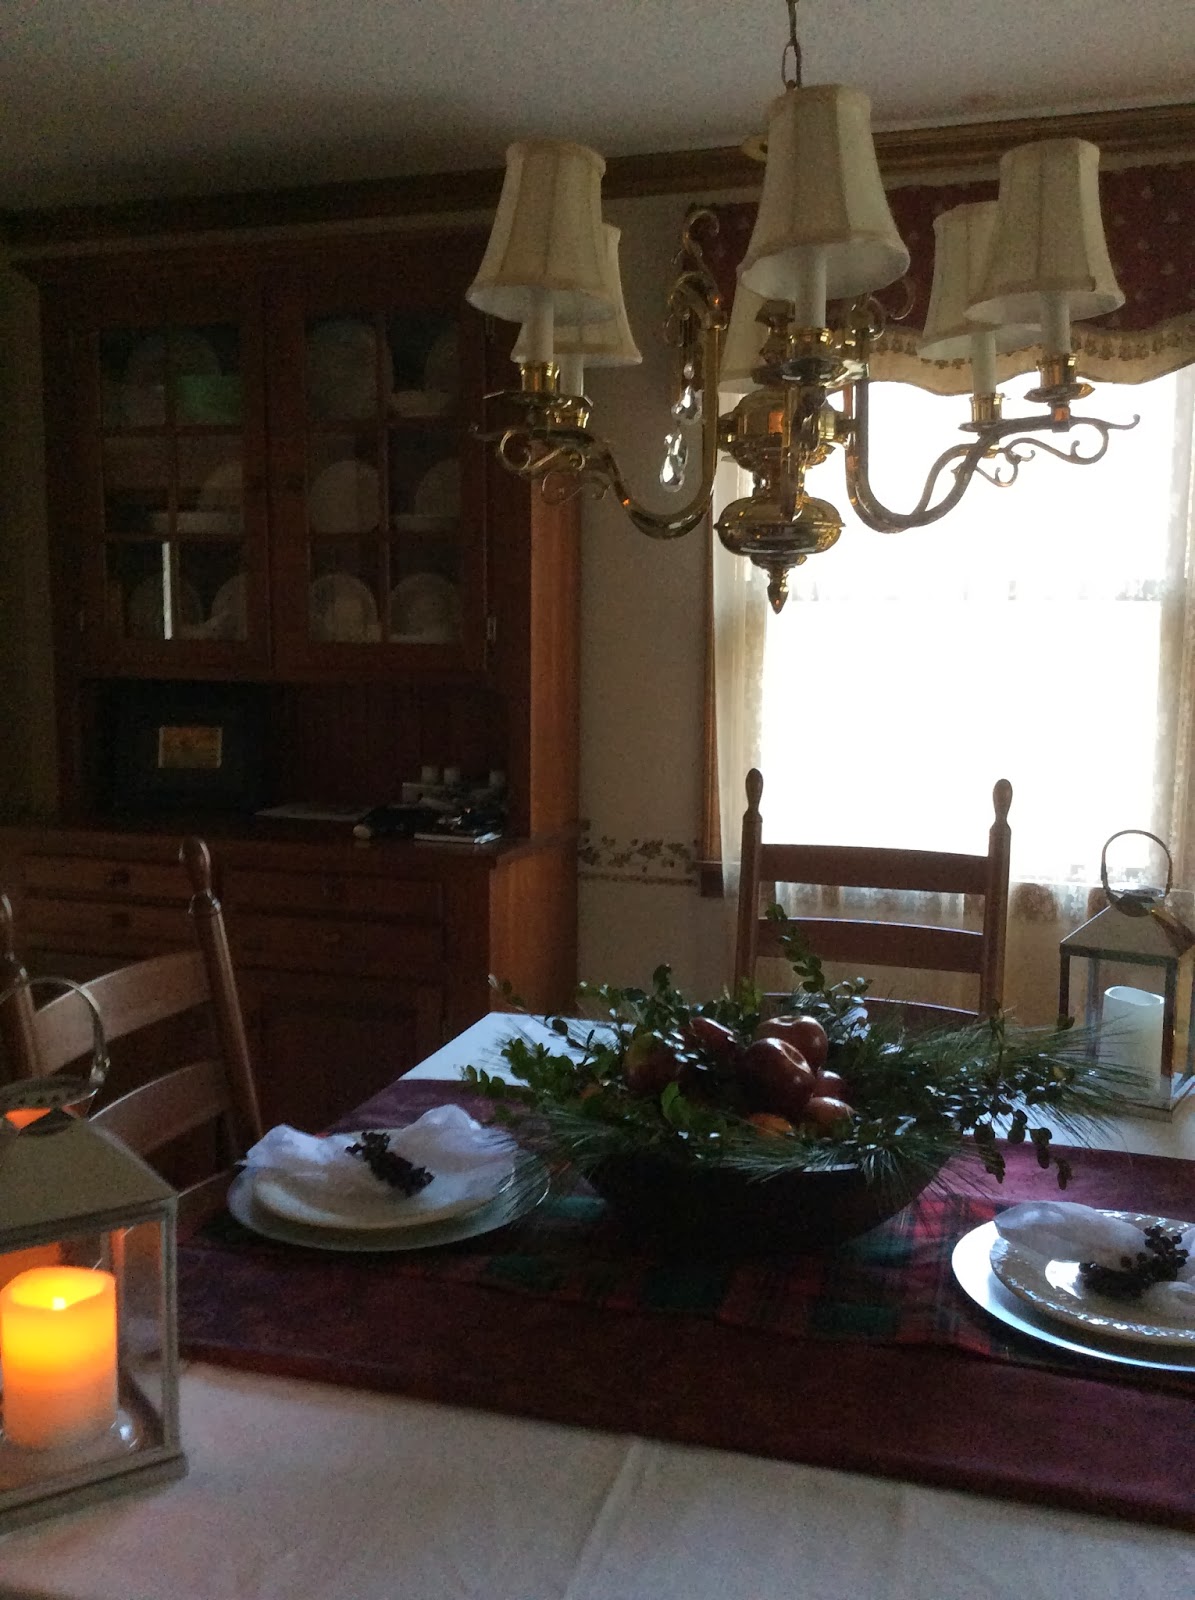 |
| In lieu of a typical flower display I decided to use items and greenery that I already had around my house. I used this antique wooden bowl of my grandmothers and put a wicker charger inside of it to raise up the apples and greenery inside. That's a great tip for when you don't have a lot of materials to work with. Then I just went out into my yard and clipped some white pine, boxwood and holly. To finish the look I placed a luscious pile Macintosh apples in the center to tie in the red of my tablecloths. |
|| Re-Usable Party Banners ||

I’ve always been of the opinion that the swiftest and surest way of instituting a festive air in any room is through the strategic use of celebratory banners.
Depending on where you shop {Especially online} you can find some very elegant and festive party decorations. The only down side is that more often than not, those decorations are too fragile to keep; they’re disposable. Party planning, arranging and purchasing is expensive and time-consuming enough, wouldn’t it be nice to be able to keep some of those decorations? Not all celebrations are one-time-only situations. That is, events that only come around once in a lifetime. Consider Holidays. Obviously, they come around every year. Birthdays too. Even events like weddings and showers; in all likelihood, any given person is going to go to more than one of each in their lifetime.
These were the thoughts running through my mind as I was contemplating my Christmas decorations. Don’t worry! Halloween hasn’t even come around yet; I’m far from putting up my Christmas decorations. But in the past, when I’ve wanted to craft something for the holidays, I've found that if I wait too long to get my materials, some other clever people have beaten me to the punch and there’s nothing but the dregs left. No Christmas crafts for me! This year I decided to get a jump on it and make something sooner rather than later.
That was when I thought of the banners. I needed to make them out of durable materials; something that would last the years. And I wanted the pattern to be something festive, but that lent itself well to other celebrations. I elected for the triangle shape. Traditional and simple. And depending on the color combinations {only limited by your imagination!} that basic style would be perfect for any event.
Here are the materials I used:
Sewing scissors
Scissors for paper
1/2 a yard of Flag material: Something durable
Flame Torch
Pen
Painters Tape
Newspaper or bags {to help keep the mess down}
Snowflake Stencil {or any stencil you like that suits your occasion}
Heavyweight Paper {to make your flag pattern}
Metallic Spray Paint {here I have silver and gold}
Some type of yarn or thread to connect the flags

For the flags I found this faux suede upholstery material in a beautiful pale, peachy pink color. I know; doesn’t sound very Christmas-y, but after I’m done it will. Also, keep in mind that this banner won’t be the only Holiday decorations in my room. And en masse, everything will definitely have a jolly feel. Plus, I wanted a color combination that would complement my room, which has nudes and taupe’s and pale pinks. Don't get bogged down by the price tags for the fancy upholstery material! Remember, you're only going to need a 1/2 a yard {I happened to buy 1 full yard because the material was 50% off that weekend} for this and, I don't know about you guys, but I never go into a craft store un-armed with coupons. In the end, the price wil be very reasonable. And it's worth it for re-usable decorations! You'll be able to use them year after year.
First, for the flag pattern I Googled under images ‘party flag triangle pattern’. There, I happened to find the perfect triangle shape. The key is to find a triangle that is rather oblong and has two sides that are both the same length and longer than the third. I printed it out, cut out the triangle and traced it onto a more heavyweight paper {I found some old matte photo paper in my desk}. This will make it easier to trace all of the triangles onto the fabric later.
Next, lay out your flag fabric upside-down {the pretty side is facing down} and lay the triangle pattern onto it. With the pen, trace the triangle image onto the 'wrong' of the fabric. You don’t want the pen marks to show on the front, this is why the fabric is upside-down. I traced ten flags for my purposes. I wanted the banner to cover my two windows and I think ten will do, but cut out as many as you see fit.

Once they’re all cut out, you’ll use the flame torch to singe all three sides of each triangle. Be careful! I recommend doing this outside {on a windless day!} if at all possible, where you’ll be far away from anything that can catch fire. The purpose of the singeing is to prevent the material from fraying. You don’t have to go crazy; just a few seconds for every few inches should do it. I actually like the look of the singe. It wasn’t very noticeable, but it added a nice home-made, vintage feel.
Now we get to paint!
You’ll want to do this outside too for ventilation and the purposes of keeping everything clean.
I only wanted the bottom half painted, so I covered the rest with painters tape and paper to keep it protected. Three coats will do. Just wait a few minutes in-between coats. I did this for 5 flags. For the remaining 5 I did the snowflake stencil. Of course, this is Christmas/winter themed, so that’s why I did the snowflake, but you can do whatever stencil your heart desires. Valentines day? How about hearts. Birthday? Maybe a cake stencil. Instead of images how about letters? Spell out the person’s name or "Noel" for Christmas or "Happy Halloween!". The sky's the limit!

At the craft store I happened to find these balsa wood snowflakes that fit perfectly inside my flags. Of course because I have snowflakes instead of snowflake stencils, my image on my flag will be a negative, but I like it.
I taped up the remaining 5 flags, but this time I covered only the top half, so the bottom half was exposed. I placed the snowflake over the uncovered part of the flag and sprayed around it. Once I took the flag away a negative image of the snowflake remained. Very pretty!


The last part is just stringing the flags together. For the cord I happened to use some old white fuzzy yarn I had sitting around my house. It’s nice when you can use items you already have, but I think it would look very nice with ribbon or raffia or even some clear fishing line. With fishing line you’d have a lovely suspended-in-mid-air look. Perfect for Halloween!

I used this grommet kit to make the holes for the yarn to go through. It was only $7 at Home Depot! I'll explain in another post how to use this kit in detail, but honestly, it's incredibly simple to use. It comes with nearly everything you need {including directions}. I say 'nearly' because it came with this 'cutter' {as seen below}, but I wasn't successful in using it to cut a hole through my fabric.

So, instead, I used the 'cutter' to make a small circular imprint in the fabric where I wanted my hole to be, then I used my small fabric shears to cut a hole within that small pattern I had just made.

From there I followed the directions to the letter. This is what they looked like when done:


 |
| {The only tip I have for this step is when you hammer the grommet in, make sure that the pretty side of the fabric is face down! That way the more attractive grommet side will be facing outward when you're finished.} |


I love how the glow of light behind the windows makes the snowflake stand out!
Good luck!
+ - - - - Red Riding Hood


Dark Princess Lily - Legend


")

|| Titania ||

Titania by tierneyvandervoort featuring metal wall art
|| My entry for the Polyvore DIY Halloween contest! Wish me luck! ||
|| My entry for the Polyvore DIY Halloween contest! Wish me luck! ||


Just a Halloween tablescape I crafted with my mother. We love the bell jar! Typically, they're used for terrarium use, but we wanted a 'specimen' feel to the decorations.

The scull is actually made out of plaster and is hollow in the center -- just begging for a tea light! The battery operated tea lights are perfect for this purpose because we won't have to worry about fire risk or no fire at all because of the lack of oxygen under the dome.
The spiders are (shock!) fake. In fact, they're the realist fake spiders I've ever seen!


Happy October, Everyone!
--------------------------------------------------------------------------------------------------------------------------
The Value of Investment Purchases ///
Lately, I've been re-evaluating my fashion purchases. I love to shop as much as the next person, but after cleaning out my closet recently and finding far too much to toss/donate, I came to the conclusion that I'm not investing on classic pieces that will see me through the years.
I think people hear the word 'classic' and images of tweeds, button-down shirts, trousers and loafers come to mind, and although I love all of these babies {have you checked out Jack Wills or Steven Alan?}, I know they're not for everyone. What I, personally, mean by 'classic' is something that you just absolutely adore. A piece you love so much you know, without a shadow of a doubt, that you'll be adorning yourself with it for years to come. In fact, it'll fall apart before you want to stop wearing it. That's how much you love it.
I read a book recently: Overdressed: The Shockingly High Cost of Cheap Fashion by Elizabeth Cline. It was a true eye-opener. In the back of our minds I think we all have an a certain assumption of what the conditions for textile factory workers are. In many areas across the world, those conditions are, indeed, terrible. And to add insult to injury, they're paid too little to even live on.
More often than not, extended families {as opposed to just parents and children} that work in textile factories are forced to live under the same {tiny} roof to save money and get by.
The most poignant idea I read in Elizabeth USA
So how does that laborer make any money at all? They make hundreds {if not more} of that same blouse. And they have to make them fast. When production is that rapid, quality is lost. That blouse may only have cost $7, but it’s a good thing because it certainly won’t live out the year!
After I read Elizabeth Cline’s book, I found myself reshuffling my fashion priorities and asking myself new questions: How often will I wear this? Do I really love this? Where can I realistically wear this?
I was surprised {while going through my wardrobe} how little I wore many of my garments. And it wasn’t just because of the seasons. That sweater wasn’t lying on the bottom of my dresser drawer because it was a little too warm out. I wasn’t wearing it because it had 1 inch long studs festooning the shoulders. Only a year later that sweater seemed entirely outdated. That’s about $25 I’ll never get back.
So, I made the decision to only buy items that I absolutely adore; things that flatter me, but will withstand the test of time. I must confess, I’m pretty sure that if I walked into Forever 21 or H&M or Gap, I could find something I love within minutes. But I know that that dress or top or pair of shoes won’t last. They’ll tear easily, pill too quickly, stain randomly, shrink or {even worse!} stretch out unexpectedly. Just in one closet clean sweep alone I probably donated/tossed out a couple hundred dollars worth of items that I only wore a handful of times because they’re already outdated or they simply fell apart.
It’s a personal decision, but in my eyes, I’d rather spend a little more on clothes that will last rather than a few dollars on clothes that are too trendy and go out of style within months or fall apart after one season. It means I shop a lot less; hardly ever as a matter of fact. But I prefer it that way. I do a lot of window shopping and that has its merits. I find myself coming back to the same dress or blazer or pair of shoes; coveting them and drooling over how beautiful they are. I can’t afford them now, but I’ll save up for them. It means that when I actually can get them, I love them that much more because I had to wait and earn them. Saving makes them special and the quality is top notch.
And there’s the added benefit of being capable of looking on 5-year-old photos of myself and not exclaiming, “Oh my Gad! What, did I live in neon and studs?!” My ‘slow fashion’ purchases will look fabulous 1 year from now, 5 years and decades into the future! I say ‘slow fashion’ because better quality clothes are made in smaller factories where time is taken to produce a superior garment. The laborers here are paid much more {something they can actually live on} and the batches are smaller so attention can be paid to attractive details that you just don’t find in places like Forever 21 or H&M.
In the meantime, I still have old clothes that I feel guilty throwing away. So, I’m going to refashion them. This old dress for example is something I wore maybe twice and will never wear again. This was a Marshall
I’m not suggesting that every time someone needs a new top they absolutely must spend at least $100. But I can’t be the only one who’s cleaned out their closet and been shocked with how much they tossed! And if you added up all those clothes, how much did you throw away? You may have only spent $15 on a sweater and $10 on a top and $20 on shoes, but you just tossed two sweaters, four tops and three pairs of shoes. That’s $130! That kind of money could buy you one nice silk top. $130 for one item may make some gasp, but you're not really buying a label, it’s investing in a piece that will last. The reason that it’s more expensive is because often it’s made from biodegradable or natural fibers (silk, cotton, linen, etc.), laborers are paid more, and the facilities are smaller with better working conditions.
It’s food for thought, at any rate.
/////////////////////////////////////////////////////////////////////////////////////////////////////////////////////////////////////////////////////
Homemade Body Scrub ||

So, I must confess my new favorite luxury. More than just the indulgent feeling I get while using it, these homemade delights have the added bonus of being so economical!
I’ve been making my own body scrubs these days. Never again will I spend gross amounts of my hard earned money on pre-made scrubs with ingredients that are nefarious at best. They’re so simple to make; all you need are a few basics and then you can switch up the components on your own to make something completely unique! They’re great as gifts too; birthdays, Holidays, you name it.
Broken down into they’re most basic factors, body scrubs are nothing but a combination of exfoliators and hydrators. The former being the abrasive quality that sloughs away dead skin, making it soft, and the latter being the component that keeps your skin soft and hydrated.

Exfoliator: the abrasive component. This is what will actually scrub all of the dead skin cells away leaving you mink soft. Typical abrasives are salt or sugar. When I say salt or sugar, I literally mean the salt or sugar sitting in your pantry probably collecting dust because you bought it in bulk last Christmas and you still have your weight of it left over from then.
You may be asking yourself, which should I use? Salt or sugar? It really depends on your sensitivity level. Salt granules are typically larger than sugar granules and therefore salt scrubs will be more abrasive than sugar scrubs. If you exfoliate infrequently or have sensitive skin, I recommend using sugar. The granules are smaller and it won’t tear away 7 layers of your epidermis.
Truthfully speaking, I like to use two exfoliators in my body scrubs. However the additional one is in liquid form. I like to add citrus juices as well to help with dead skin removal. The mild acidic quality of the fresh juice helps remove dead skin. It’s like using a chemical peal, but nowhere near as powerful or violent. Plus, there’s the added benefit of the lovely citrus scent that seems to lend itself very well other scents.
On to the next component.
Hydrator: The second component of your homemade scrub will be the hydrating component. This is the loveliest part of the recipe. This is what hydrates your skin so that you don’t look like a crocodile when you’ve finished sloughing away all your dead skin. This component is in the form of oil.
There’s a myriad of oils you can choose from. Jojoba, coconut, extra virgin (yes the stuff you cook with), vegetable (ditto), baby oil, almond oil, safflower. Choosing which hydrant to use is also dependent on your sensitivity level. Different oils may react differently on people. I happen to adore coconut oil. The only reason I wasn’t gun shy about using it all over my skin is because I happened to have it used on me the last time I got a massage, so I knew that I wouldn’t break out.
If you’re not sure about which oil to use, just try them out in small doses. Often when you go to a Whole Foods, for example, in the beauty section they’ll have all of these oils and then some for you to try as samples (just like you would at Bath and Body). Go, try some samples, give it the rest of the day and if your skin feels fine, then consider one of those oils for your scrubs. After you rule out the breaking-out-in-hives factor, then it’s just a matter of choosing which oil you prefer based on its feel to your skin (smooth, too greasy, etc.) and scent.
As I mentioned before I love coconut oil. I love the nutty scent, the feel, everything about it. It makes my skin baby soft. Touchably soft. {Coconut oil is bought in solid form, but melts as soon as you touch it. Just put a little bit in a pot over the stove to melt it for use in the scrub.} But, just like I prefer to add a second exfoliator, I also like to add an additional hydrator. While I change from citrus to citrus (sometimes fresh orange juice, lime, lemon, grapefruit), my additional hydrator is always the same: honey.
Oh, the miracle of honey. It’s a natural anti-bacterial and anti-fungal agent so it helps speed up acne healing. It’s sensitive for all skin types so it won’t make you break out and it naturally detoxifies your skin! AND it hydrates! What a miracle of nature.
So, yes, I throw that in as well.

Let’s recap: We have some sugar, some citrus juice, some oil and some honey.
At this point, you’re done. You have all the ingredients.
But how much of each ingredient do I put in?! You never said!
I know this sounds scary but, honestly, you put in however much you think you should put in.
I recommend putting in your liquids first. That is, your oil, honey and citrus. And add them in small amounts to start. You can always add more later. Once all of your liquids are in, start adding the sugar (or salt). You only add as much sugar as you want. If you add some sugar and the scrub still seems a little too liquid-y, then add some more sugar. If you put in too much sugar, add a little more of one of the liquids.
I find that too little sugar and the scrub isn’t stiff enough for me and I can’t use it as well.
Really that’s all there is to it!
Here are some things that I like to add to the scrub once it’s finished just for scent.
Herbs – dried or fresh.
Mint and lime go great together. Mash up some fresh mint and add it to the scrub for a super refreshing body scrub in the heat of summer.
Spices – I love adding freshly ground clove to my scrubs with orange juice. Oh my lord, the aroma of clove and orange is to die for! I use my grandmothers old mortar and pistol to grind them up.

Play around with them. The combinations are only limited by your own imagination!

=====================================================================
Studded Jeans ||
So this is my DIY for how I studded my old white pair of jeans. I bought these babies for about $11. I finally got bored with them and decided to jazz them up a bit with some studs that I bought online.

These studs I bought online at Studsandspikes.com. It's a wonderful site where you can buy all sizes of studs and spikes in all sorts of shapes including round, square and even stars! They also come in different colors.


No comments:
Post a Comment