
Recessed lighting.
Who doesn’t love its instant glamor effects? But since I’m perpetually
on a budget, recessed lighting don’t fly.
I have to make due with avant garde lamps and lighting
alternatives. That’s where these pendant
lights come in. All the benefit of
pendant lights, but with a long flexible cord that you can hang at any height
and wrap around whatever you can imagine.
In this case I wanted something a little on the rustic side. A little bohemian chic, if you will.
I took inspiration from those sweet little
hippie/bohemian/gypsy tents you see all over Pinterest and Free People and
Anthropologie display floors. I loved
the idea of the white-washed rustic wooden tent effect and hanging the pendant
light on that. Here’s how I did it:
Materials:
Pendant Light Cord
Edison Bulb
Found Wooden Branches {3, plus 1 test piece}
1 Quart of White Sample Paint
Foam Brush
Disposable Container
Paint Sturer
Paper Towels
Step One –
Gather the wood:
I found my wooden staffs in the woods that abut my
house. My suggestion is that you go for
a lovely hike and locate yours, or, if you’re as lucky as me, go into your own
backyard and do likewise. I must confess,
though, that I gathered mine in the very earliest stages of spring – before the
green sprung. The woods are magnificent,
but I must admit that the area around my home is absolutely blanketed with poison ivy during the
high season. And, I swear, if I just walk by the stuff I break out in those
horrible itchy bubbles, so I have to stay clear this time of year.
 |
| Don't mind my stacks of Harry Potter's and Narnia in the background... Oh hey look, old text books! |
Now, in truth, these pendant lights do not weigh much at
all, so I didn’t really need to worry about the sturdiness of my staffs [per
se], but if you want to make sure that they don’t break on you months later
here’s my suggestion: locate a fallen branch in the woods that looks like it
will fit the bill, pick it up and wham it as hard as you can against a nearby
established [old] tree. [WEAR GOGGLES,
HEAVY CLOTHES AND GLOVES TO AVOID INJURIES!] Now if the branch shatters into
several pieces, obviously it’s not the one for you. Keep looking.
Occasionally I would find a good looking specimen and slam it against a
tree to make it a more reasonable length, although this isn’t entirely necessary because we’ll be
taking care of length in another step.
One important thing to remember here is to locate nearly, if
not entirely, bark-free staffs. This
will help the white-wash stick better and help you achieve the look I did in my
images. Also, pick up an extra bark-less
mini piece of wood to do paint tests
on later.
You need three
staffs in total, plus the mini. Once you
find them, continue on your hike and take them home.
Step Two –
Prep the staffs:
Use a damp paper towel or cloth and clean the staffs; this
includes taking off any residual bark as best you can. Let them dry for a day to be safe before you
start painting.
In the meantime, we can shorten the staffs to the lengths we
like. Again, adult supervision necessary. Protect
yourself accordingly. Get yourself a
saw and a sturdy surface and sheer those babies off to your desired length.
Mine was about 6 feet. Of course, you
could look for the perfect length while you’re scouring for the staffs in the
woods, but I prefer to shave the lengths off anyway because I want the bottom
of my staffs to be flat so they’re sturdier while balanced on my floor.
Tip for selecting the
lengths of your staffs: The length of your staffs really depends on how
tall your ceilings are and how high you want the pendant to be. As you can see from my images, the cord is
wrapped around the staffs where they meet at the top and hangs down the
center. The taller your staffs, the
higher the intersection of the three will be and the higher your pendant will
hang. Keep this in mind while you’re
selecting your staffs in the woods and sheering them off later.
Step Three –
Prep the white-wash:

If you research on the internet, you’ll find all manner of
white-wash paints and stains, but don’t bog yourself down with all of that
information. Take my advice instead. You
know those quart sized samples you can get at home improvement stores [seen in the far left of the image above]? Well,
they all start off as white before they mix the color sample in, so just get
one of those quart size samples in white. While you’re there pick up a foam
brush, paint stirrer and a plastic container to mix the white paint and water
in.
Here’s where the paint tests come in. Pour some of the white paint into your
plastic disposable container and then start adding water a couple of table
spoons at a time and mix in with a paint stirrer. Use the foam brush to paint on your test
piece of wood [that you’ve cleaned and prepped earlier with the other three
staffs] to see how it works for you.
Now this is the important tip: Use some paper towels to
wipe off the paint immediately after
you put it on. So, paint your test piece of wood in small sections, wipe it off
immediately and see how it looks. You
can be pretty vigorous here. Don’t worry
about taking off too much paint – it’s impossible. The stain effect will be immediate and
permanent, regardless of how vigorous you wipe the paint off.
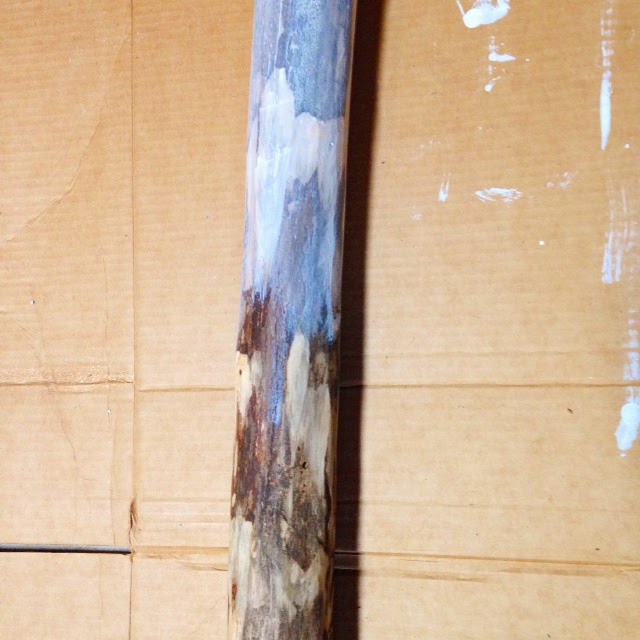
 |
| My test piece. You can see in the image the difference between the unstained wood [bottom] and the white-washed [above]. |
If it’s not sheer enough after your test, add
more water. Keep going until it looks
right for you. You’ll probably have to
add more water than you think. Once you’ve got the ratios right, you’re ready
to paint the real thing.
Step Four –
Painting the staffs:
Follow the procedure mentioned above for achieving the white-wash
look. At this point you should be a pro,
having used your test piece to full advantage already. My advice is to work in sections. If you try to paint the whole staff [or too
large of a section] at once, you’ll find that too much of the paint has seeped
into the wood and it won’t wipe off as easy. This will result in patchy paint
work.
Not pretty. Work in small sections.


Once all the staffs are painted, let them dry for a day
before lashing them together.
Step Five –
Lashing the staffs together:
I played around with my staffs for a little bit; putting one
uneven end [the non-flat, sawed off
end] over the other to see which position I liked best. Once I had them in the position I liked, I
wrapped a long length of leather cord around the intersection several times and
tied it with a double-knotted bow.
That’s it.

It doesn’t get any more complicated than that.
My only suggestion is to lash them together in the area
where you’ll actually be displaying your DIY lamp permanently. This way you don’t have to worry about
transportation later.
Spread out the feet as wide as you can and get it into a
sturdy position.
Step Six –
Wrapping the pendant light:

This step is very subjective. It all depends on the look you want. I elected to wrap most of my cord around the
staffs themselves, but I’ve seen other people
wrap the cord more along the legs and down the staffs, or curling the length up into several ‘O’s and
keeping them together with a zip tie and letting it hang. It’s entirely up to
you. I would only gently suggest that you don’t allow the cord to lie on the
floor at all to protect it from children, pets and the vacuum cleaner.


Hang it the way you like it and enjoy!
{See images below for closeups of my vignette and details on my little bobbles.}
 |
| Crystal point necklaces. Found in another of my posts here // Kate Spade Skinny Mini Necklace on right // Vintage necklace in center. |
 | |
| Front, center - Lulu Frost bracelet // Barr-Co. perfume found here // My collection of threadbare rings |
 |
| Bracelets {from bottom up} - deco inspired cuff // vintage bakelite // Et Cetera, Et Cetera Idion Bangle // Vintage orange leopard hinge bangle found at the Brimfield Antique Fair |
 |
| \\ Vintage crystal screw-back earrings // |
 |
| \\ Hand painted {by yours truly} pheasant feathers // |

